It seems like everyone is either sweets baking away their blues or caffeinating at a high rate while they’re stuck at home during Covid. But small batch baking treats and coffee aside, I think the biggest thing that everyone is doing right now is baking sourdough!
Are you a fan of sourdough? A long time ago I didn’t like it. That was back in the day when people’s sourdough loaves were literally sour. Artisan bread has come a long way from then and now sourdough is complex, rich, and seriously good. I’m pretty sure anyone who has had a really good sourdough has thought about making sourdough at home. After all, all you need is flour and water.
If you’ve been to the grocery store lately you’ve probably noticed lots of empty shelves. Paper products and cleaning supplies are missing. Eggs are hit or miss, flour is hard to come by and there is not yeast. What’s a new bread maker to do? Make your own! Gather wild yeast and start a sourdough starter. Yeast is everywhere, you just need to harness it.
What is Sourdough?
Sourdough is loose term that refers to bread that’s been made with a wild yeast starter rather than commercial yeast. Contrary to the name, not all sourdough tastes sour at all. Sourdough starter can be used to make all kinds of yeasted breads: sourdough cinnamon buns, sourdough, babka, essentially anything that uses yeast can be made with sourdough.
What is Yeast and Why is it Wild?
Yeast are the little beasties that brings your bread to life! Yeast is what makes breads light and fluffy. Basically it eats the sugars in flour and releases carbon dioxide, which makes bread rise.
There’s wild yeast everywhere around us. It’s in the air, in flours, in trees, on fruit, it’s everywhere.
What Can I Bake With My Yeast/Sourdough Starter?
You can use sourdough starter/yeast to bake anything! Sourdough bread obviously, but also things like pizza crust, focaccia, rustic loves, sandwich bread, baguettes, pretzels, doughnuts, and the list goes on. Anything yeasted is a go.
What About Sourdough Discard?
When you feed your sourdough (more on that later) you need to take away some of the sourdough mixture otherwise you’ll end up with too much sourdough. The amount you take away is called “discard.”
What Can I Make With Sourdough Discard?
When you have a sourdough starter there’s always going to be discard otherwise you’ll end up with a giant vat of living breathing sourdough starter that will eat you out of house and home. Even with a small sourdough starter, you’ll have discard. But, the good news is that there are tones of things you can make with it:
pancakes, waffles, English muffins, crumpets, popovers/Yorkshire puddings, cake, banana bread, quick breads, crackers, muffins, corn bread, naan.
Why You Should Make a Small Sourdough Starter
Right now flour is a hot commodity. Because there will inevitably be sourdough discard the best thing you can do if you want to make sourdough is make a small sourdough starter. Having a smaller starter means less discard and less flour to feed. A small starter will be more than enough for a home baker to bake multiple loaves of bread because you can use your starter to create a levain, which is an offshoot of your starter. The best part though is that you won’t need a huge amount of flour at the beginning. It’s a low investment scaled down starter.
How to Make a Small Batch of Sourdough Starter
What You Need
- Flour – It’s easier to start a sourdough starter with freshly milled flour but you can most definitely do it with AP flour. If you have whole wheat or rye flour on hand, a 50/50 mix of flour is best.
- Water – Room temperature filtered water or tap water that’s left out overnight so that any chlorine in the water disappeared.
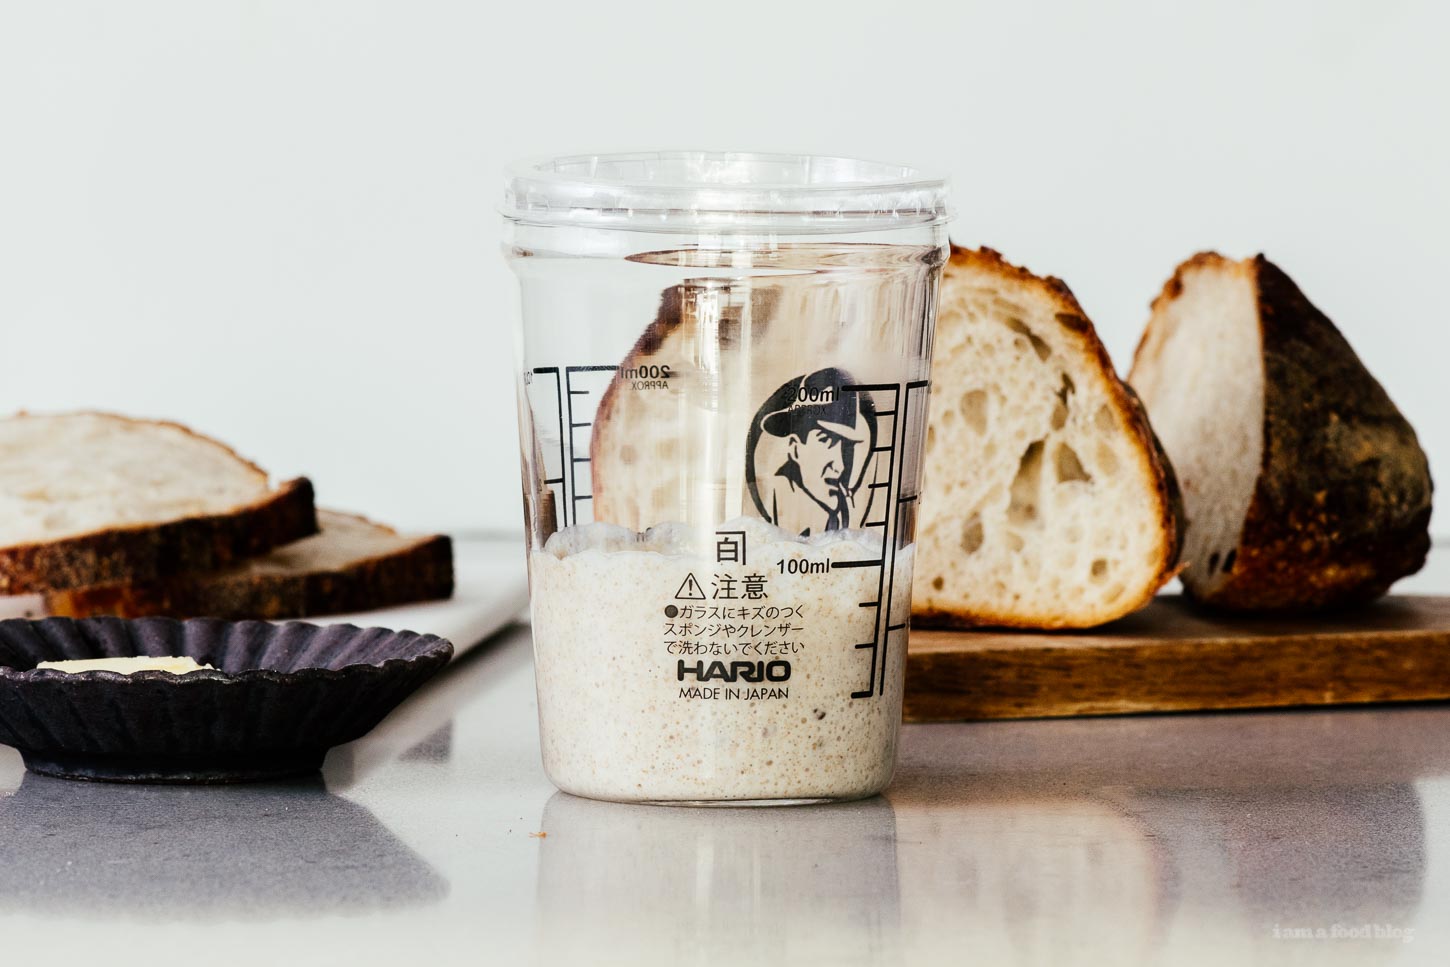
- A container – I like to use a small, tall, straight sided glass container so I can see exactly how much my starter grows and when it needs to be feed. You’ll need a jar with a lid but don’t put the lid on tightly, so gases can escape.
- Kitchen Scale – Technically you could eyeball your starter and use tablespoons but if you’re going to be baking sourdough you’re probably going to want to invest in a kitchen scale. A kitchen scale will give you accuracy and help you bake consistent loves.
- Rubber spatula – This isn’t technically a “need” but it makes it really easy to mix your starter and scrape down the sides of your container.
Day 1
In the morning, make a flour mix as food for your starter: Take an empty container and mix in 200 grams of all purpose flour and 200 grams of rye or whole wheat flour. Set aside.
Take your jar and put it on the kitchen scale and tare (that is, minus the weight of the jar). Add 15 grams of your flour mix and 15 grams of water. Mix very well until all the dry parts are incorporated. Lightly cover and keep in a warm spot in your kitchen, ideally 80°F-85°F (26°C or higher). If your kitchen is cold, you can help the starter by warming up the water to 80°F (26°C). Let the mixture rest for 24 hours. Make a note of the time.
Day 2
It’s time to feed your starter! You want to do this the next day, at the same time that you created your starter. Place a bowl (or jar) on the scale and tare. Stir your starter then add 5 grams of your starter, 15 grams of the flour mix, and 15 grams water to the bowl (or jar) on the scale. Mix very well until everything is uniform.
The original jar will have some discard in it that you’ll need to get rid of. At this point you can’t really use it to make food (plus it’s so tiny) so just compost it and wash your jar.
Put the new sourdough starter in the jar (if you used a bowl), place the lid on loosely and put it in a warm spot for 24 hours.
Day 3
This is the day that you’ll probably see some very small bubbles breaking the surface of your starter. But if you don’t, don’t worry about it and stick to the schedule, sometimes starters just take a while to get going. At the same time as you did the feeding the other day, place a bowl (or jar) on the scale and tare. Stir your starter then add 5 grams of your starter, 15 grams of the flour mix, and 15 grams water to the bowl (or jar) on the scale. Mix very well until everything is uniform.
Pop the starter in a clean jar (if you used a bowl) and let rest in a warm spot for 24 hours.
Day 4
Day 4 is the day we will feed twice: once in the morning and once at night.
In the morning you should probably start to see some more sides of growth. The level of your mixture will have risen and fallen and you’ll see streaks on the side of the jar where the starter has grown.
Feed your starter: place a bowl (or jar) on the scale and tare. Stir your starter then add 5 grams of your starter, 15 grams of the flour mix, and 15 grams water to the bowl (or jar) on the scale. Mix very well until everything is uniform. Pop the starter in the clean jar (if you used a bowl) and let rest in a warm spot for 12 hours.
Note: If you have two jars by the way, you don’t have to use a bowl, you can just mix the starter into the clean jar.
After 12 hours, feed the starter again the same way: take 5 grams of starter and mix with 15 grams flour mix and 15 grams water. Discard the extra, and let the starter rest in a warm spot until the next morning.
Days 5 & 6
Keep feeding and discarding twice a day, in the morning and evening (12 hours apart).
Day 7 and Forevermore
Place a bowl (or jar) on the scale and tare. Stir your starter then add 5 grams of your starter, 15 grams of the flour mix, and 15 grams water to the bowl (or jar) on the scale. Mix very well until everything is uniform. Pop the starter in a clean jar (if you used a bowl) and let rest in a warm spot for 12 hours. By this point you can feel your starter all purpose flour and not have to feed it rye. The rye flour is just what helps it grow in the beginning. I actually feed my starter a mix, but I have successfully fed him only all purpose as well.
Hopefully by now you have a starter that is rising and falling in the jar. You’ll know if your starter is alive if it grows, almost doubling in size with an good amount of bubbles, then falls down around the same time consistently towards the bottom of the jar. You’ll want to feed your starter every 12 hours, but keep an eye on it because every starter is different and it’s best to feed your starter right after it starts to fall after peak maturity, before it starts to fall.
If you starter is not growing, don’t fret. As long as it isn’t moldy, you can still continue to harness wild yeast. Sometimes it might take a little longer to get a sourdough starter growing, maybe even up to two weeks. There are so many factors to consider: your flour, the temperature of your water, the temperature of you kitchen, how fast your starter is feeding, and the list goes on. If your starter isn’t rising and falling, be patient and continue feeding it two times as day until it starts rising and falling predictably.
I first tried my hand at sourdough three years ago. It took a while (over a month!) for me to be happy with the strength of my starter. But when I finally made a loaf of bread I was SO PROUD. There really is something magic about making bread out of just flour, water, and salt.

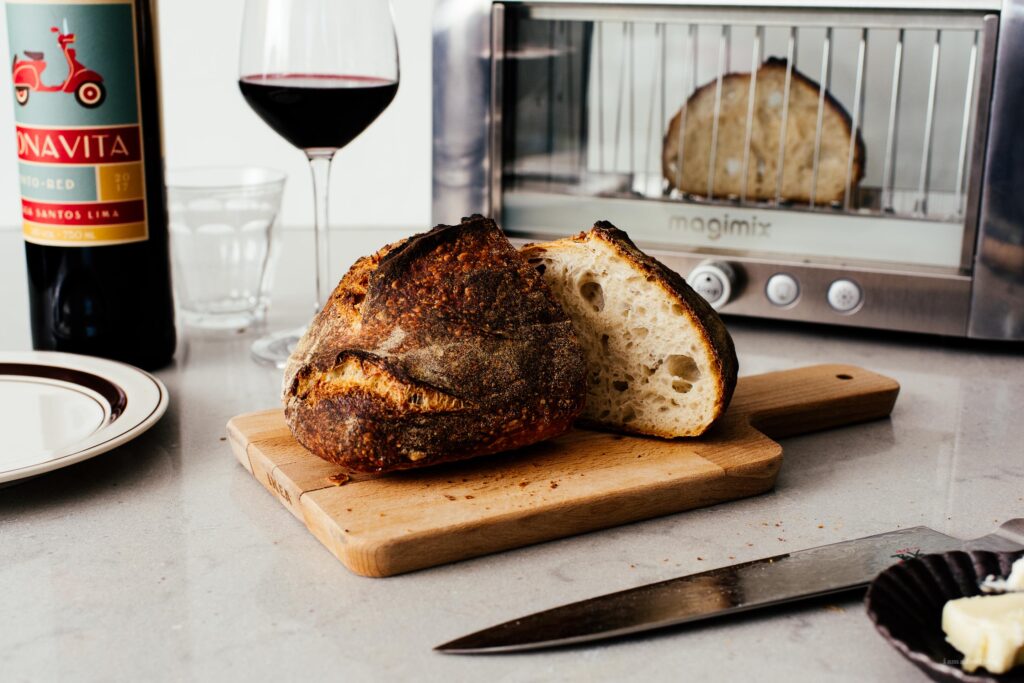
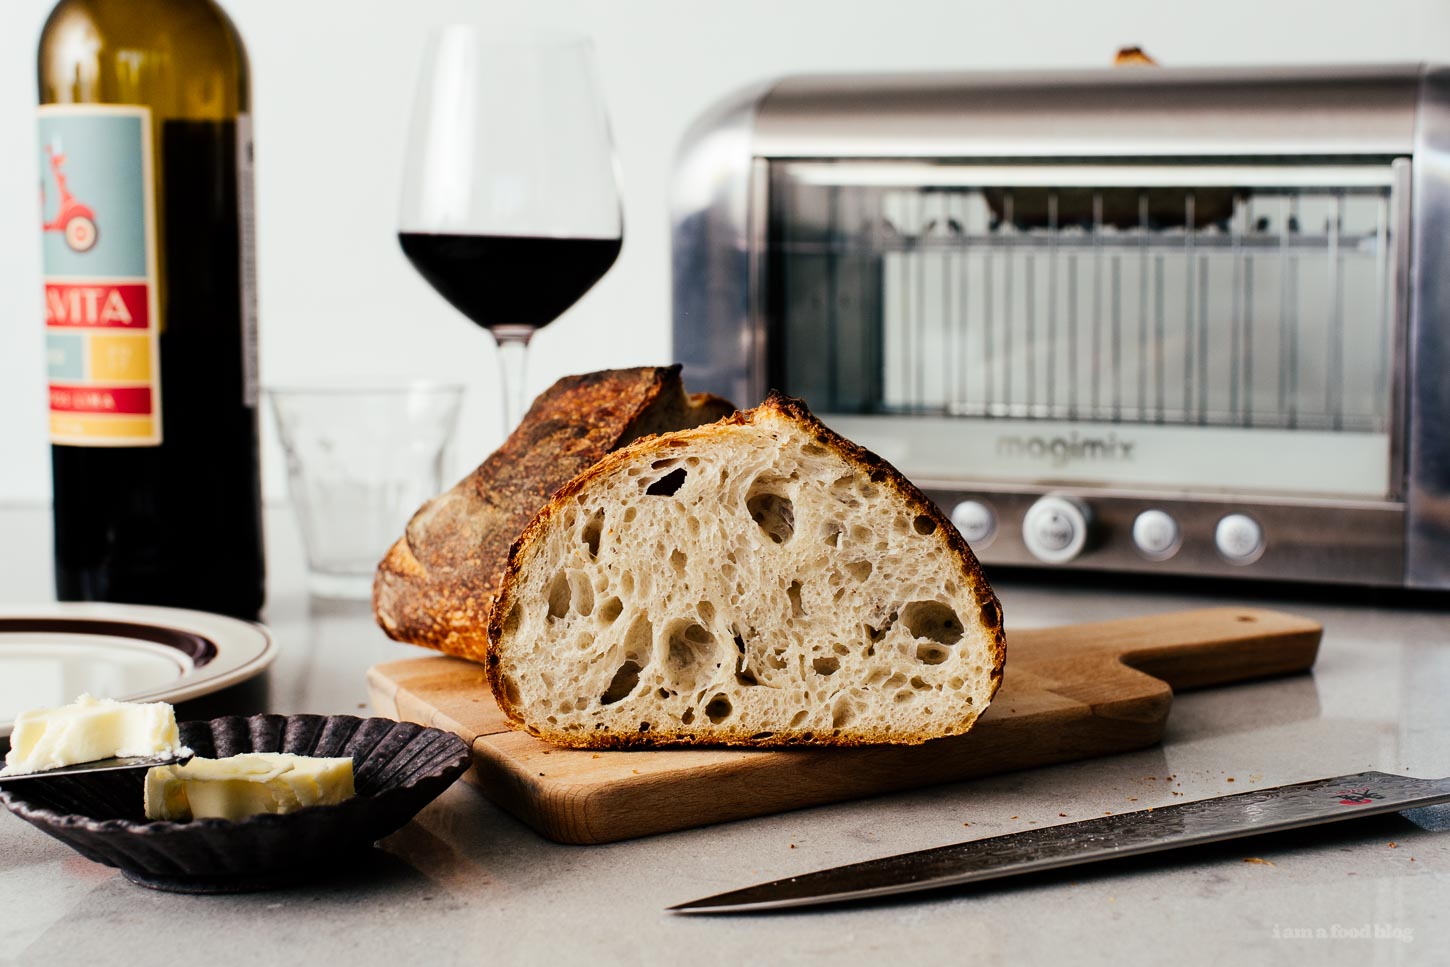
How to Bake a Small Loaf of Sourdough
Now that your starter is rising and falling predictably with lots of bubbles throughout, it’s time to bake a loaf of bread! We’re going to make a fairly small loaf that’s just about right to feed 2-4 people. It’s a basic white loaf sourdough with a bit of rye for structure and flavor, based off of one of my favorite sourdough bakeries, Sea Wolf Bakers in Seattle. They use barley flour in their white sourdough (based off rumors on the internet anyway) but because I don’t have any barley flour right now or in the foreseeable future, I went with substituting rye. I’m going to be trying an all purpose loaf in the future, so I’ll update this post when I do!
What you need to make a small batch sourdough loaf:
- kitchen scale
- active sourdough starter
- flour: all purpose and rye
- mixing bowl
- bench scraper
- proofing basket or bowl
- rice flour to dust the proofing basket/bowl
- clean kitchen towel (or liner for your proofing basket)
- dutch oven (I use a fourneau oven)
- parchment paper
- oven mitts
Here’s what you need to do:
- Build a levain – this is just a fancy way of saying that you’ll take a bit of your active sourdough starter, feed it, and let it grow until it is at or just after peak maturity. You want to do this about 10-12 hours the night before you start your loaf.
- Mix the dough – In a bowl, mix together the flour, water, and levain and let everything rest for 1 hour.
- Mix in the salt – evenly mix in the salt then let everything rest for another hour.
- Stretch and Fold + Bulk Fermentation – Let the dough rise, covered, in a warm spot for 2 hours. During the 2 hours, complete four sets of “stretch and folds.” After the stretch and fold, the dough is left to rise/ferment. At the end of the bulk fermentation, the dough should have risen slightly (this will vary depending on the brand of flour you used) and there should be some bubbles on the sides of the bowl.
- Preshape – Preshaping helps with the final shaping of your loaf and gives strength and structure to your loaf.
- Shape – This is where you’ll shape your loaf, degassing slightly and creating tight surface tension so you final baked loaf will have a nice structure and oven spring.
- Overnight Ferment – Your now shaped loaf will get popped into the fridge for an overnight retard. The coolness of the fridge will slow down the yeast and improve the overall flavor of the loaf, giving it more complexity. It’ll also help with the coloring of the crust.
- Bake – Finally you get to bake! Preheat your oven to 500°F for minimum an hour, with a dutch oven inside. When the oven is heated, remove your loaf from the fridge, flip it over, score, and bake.
- Rest, then slice and enjoy – One of the keys to good sourdough is letting it cool to room temperature, at least 1-2 hours, until the crumb is set and everything is cool. If you slice into your loaf too soon, you might get a gummy crumb.
Cheers to you and your sourdough journey. If you’re anything like me, you’ll get sucked into the world of sourdough and soon will be googling things like hydration, autolyse, final dough temperature, and the like. It can get obsessive, which is perfect for times like this.
Oh, and the very most important thing about creating a sourdough starter: don’t forget to name it! Everyone has a name for their starter because they’re just like pets. You feed them, love them, and in return they feed and love you too :)
Happy sourdoughing!
UPDATE: I have made this loaf multiple times as an all purpose only loaf, so if you only have all purpose dough on hand you can definitely make it :)


Sea Wolf Inspired Small Batch White Sourdough Loaf
Ingredients
Levain
- 10 grams sourdough starter mature
- 40 grams all purpose flour
- 40 grams water
Dough
- 245 grams all purpose flour
- 19.5 grams rye flour
- 187.5 grams water
- 52 grams levain mature
- 5.5 grams salt
Instructions
- The night before, 10-12 hours before you want to start making your loaf, make a levain by mixing together 10 grams of active starter, 40 grams all purpose flour, and 40 grams of water. Mix well and let rest, lightly covered, in a warm spot.
- The next day, when the levain has just reached peak (or just after peek), start your loaf: In a bowl, mix together 245 grams all purpose flour, 19.5 grams rye flour, 187.5 grams water, and 52 grams levain. Mix well, making sure there are no dry flour spots.
- One hour later, mix in the salt and let rest for 1 hour.
- Do a stretch and fold, then let the dough rest for 2 hours, lightly covered, preforming 1 full set of stretch and folds every half an hour. You should do a total of four sets, including the first set.To stretch and fold: lightly wet your hands and gather your dough at the top of the bowl and lift with two hands towards the ceiling, lifting and stretching enough so that you can fold the dough over on itself, tucking it into the opposite side. Rotate the bowl 180° so that the side that you tucked in is now on top and repeat the stretch and fold. Rotate the bowl 90° and then do the stretch and fold again. Rotate the bowl 180° again (so you’re on the opposite side of where you just tucked in the dough) and complete the last stretch and fold. You should have completed a stretch and fold on each “side” of the bread. Do the stretch and folds every half and hour, over the course of 2 hours.
- After the last stretch and fold, it’s time for bulk fermentation. Let the dough rest, covered for 1.5 hours to 2 hours, letting it rise, strengthen, and develop flavor. At the end of the bulk fermentation, the dough should have risen a bit (this will vary depending on starter strength and flour choice) and there should be some bubbles forming at the edges. The surface of the dough should be slightly shiny and when you shake your bowl, it should move and jiggle a little.
- Preshape: lightly flour your work surface and pour out your dough. Use a bench scraper to gently scrape and turn your dough, pulling it towards you, to develop some surface tension while shaping into a rough round circle. Let rest for 30 minutes, uncovered.
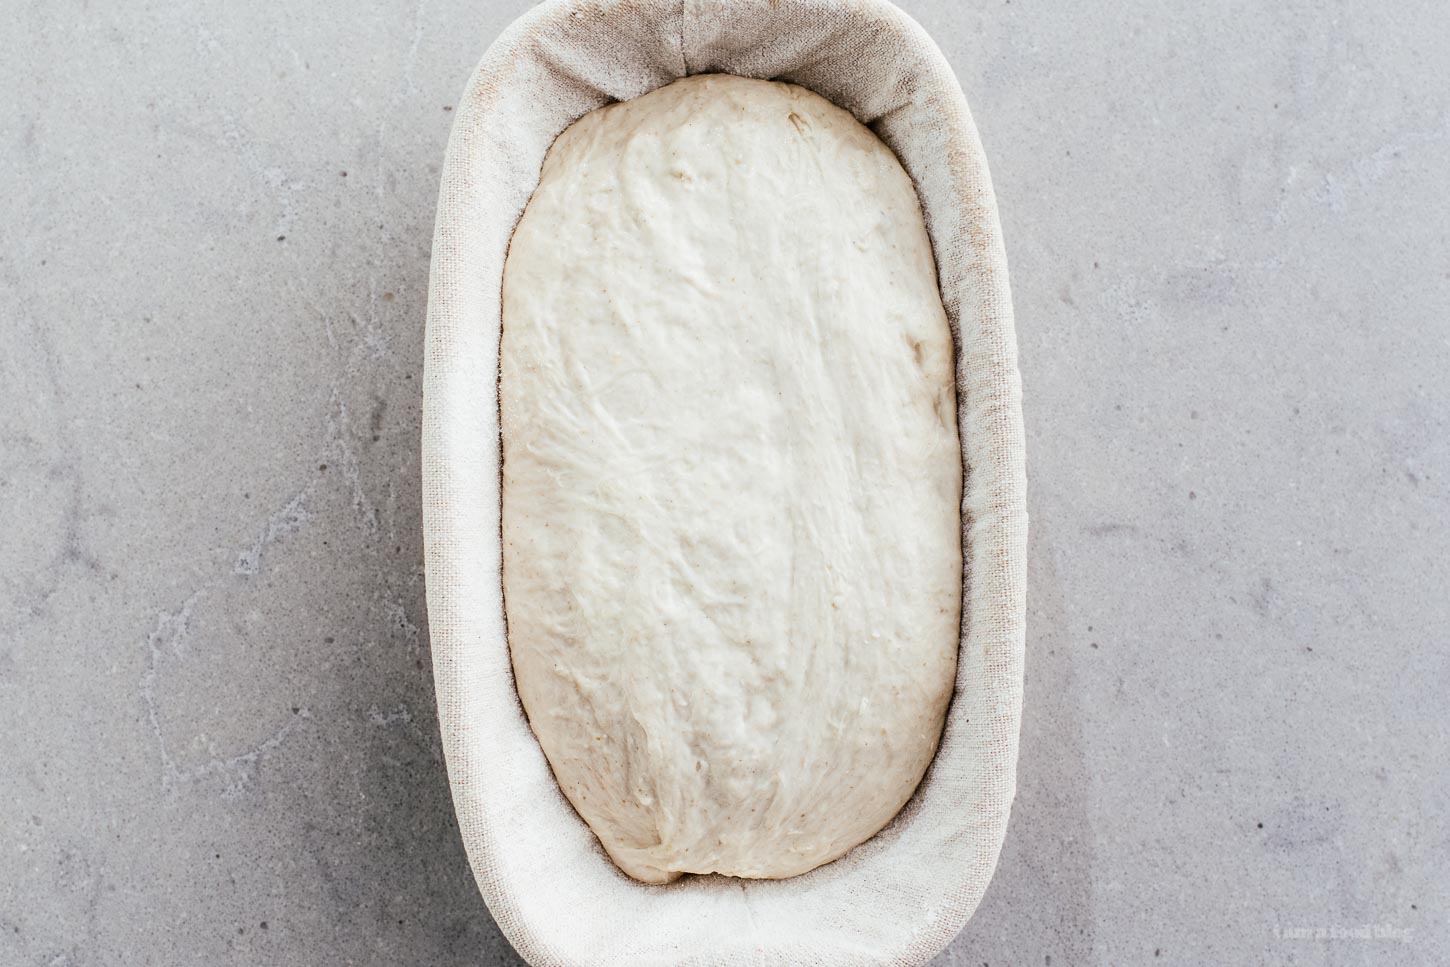
- After 30 minutes, prep your proofing basket or banneton by lining with a clean kitchen towel liberally dusted with 50/50 all purpose and rice flour. Set aside. Shape your dough: lightly dust your work surface and hands. Use a bench scraper to flip the dough over so that the bottom of the dough (the part that was touching your work surface) is now facing you and the smooth side of your dough is on the work surface.
- For a round: lightly flour your hands and stretch the dough into a rough rectangle, folding the top down towards the bottom and the bottom up towards the top. Fold the sides in and flip everything over so that the seams are on the bottom. Cup your hands together around the dough and gently pull towards your body, creating surface tension. Use your bench scraper and scoop underneath the shaped loaf and place it in your proofing basket, seam side up.For a batard: gently stretch the dough out into a rough rectangle, then bring the two sides in and overlap them in the center. Tuck the top part of the rectangle over on itself, tucking and folding until you make an oval shape. Use your bench scraper and scoop underneath the shaped loaf and place it in your proofing basket, seam side up. Pop the basket in a plastic bag (or cover lightly making sure that the covering doesn’t touch the dough). Let rest on the countertop for 30 minutes, then place in the fridge overnight.
- The next morning, place your dutch oven (keep the lid on a separate rack) in the oven and preheat by setting it to 500°F for one hour. When the preheat is done, take your loaf out of the fridge and unwrap. Cut a piece of parchment paper out a bit bigger than the size of your proofing basket. Place the parchment paper down on the loaf and flip the basket out on to a cutting board. Lightly brush away any excess flour. Score with a very sharp knife or a lame at a 45° angle.
- Very carefully pull out your dutch oven using oven mitts and use the parchment paper underneath your loaf to drop the loaf into the dutch oven. Carefully cover with the hot lid. Turn the heat down to 475°F and bake for 20 minutes. After 20 minutes, carefully remove the lid of the dutch oven and continue to bake for another 10 minutes, rotate the dutch oven, then bake for a final 10 minutes.
- When the bread is done, the crust should be golden and the internal temp should be over 208°F. Carefully remove the dutch oven from the stove (or carefully reach inside it and grab your loaf) and let cool for at least 2 hours before slicing and enjoying!
Hi, I recently got into baking bread with sourdough. As you mentioned above, there is going to be a lot of sourdough after a while. As I don‘t want to always through it away (food waste!) you mentioned one can bake other things with it. Can you give some recipes for that? Or do you just put a certain amount of sourdough in the pancakes dough, for example? I am a bit on uncertain terrain here …
Thanks a lot in advance!
Sigrid
hi sigrid,
i don’t have any sourdough discard recipes here, but there are plenty on the internet! i find that with the very small starter that i use i don’t really have much discard. i will be putting up some crackers soon!
i’ve heard that you can just use the discard in pancakes, just use your typical pancake recipe but hold back a bit of the flour and liquid. hope that helps a bit and i’ll be putting some discard sourdough posts up soon!
This is a great, super quick and easy recipe for crumpets: https://www.kingarthurflour.com/recipes/sourdough-crumpets-recipe
Otherwise, a quick google search for sourdough discard recipes will turn up hundreds of potential recipes.
thanks for writing this post. very detailed and insightful! would you be able to share how do you keep the starter alive? i’m reading it as one wld need to feed it twice a day? or is that just for Day 7? Thank you!
hi,
in the beginning, i’d say for the first two weeks or so, it’s better to feed your starter twice a day to keep it’s strength up. later on, when it’s falling and rising very predictably, you can pop it in the fridge 3-4 hours after feeding, then just take it out and feed it the night before you want to bake :)
Thank you!
Hey, have been following you for awhile, amazing recipes!. Question: where did you get that Hario jar? Thanks Shane
hi shane,
it’s a jar i repurposed – there’s this famous pudding place in japan called marlowe and when you buy their pudding it comes in a reusable hairo jar. i love it so much :)
My starter is named Audrey III (after Little Shop of Horrors) cause he’s always saying “Feed me!”
heehee sourdough starters sure do eat a lot!
Hello! How long should the overnight fermentation in the fridge go for? Thanks!
hi jamie,
i let it go for over 12 hours and it was fine – the coldness of the fridge slows down the fermentation
Hey I’m super excited to try this! I recently tried a sourdough start that didnt turn out so I’m hopeful! For the flour for the actual bread making.. if I cant get rye flour have you made if with just all purpose? Are there other flours you have used or recommend?
hi lauren,
i have successfully made this loaf with only all purpose, so that will work for sure. you can use whole wheat if you like as well :) there are so many different kinds of fun flours out there like einkorn or spelt but you don’t necessarily need them. hope that helps!
Hello! Forgive my very specific question, but I want to get this right: regarding your starter feeding instructions, when you say, “Scoop out 5g and then mix in 15g flour and 15g water,” does this mean mix those in to the 5 grams you’ve scooped out? Or add them to the starter from which you removed the 5g? Thanks! So glad for a *small* recipe.
hi maggie,
thanks for asking, i will clarify it in the post, but what i mean is: in a small bowl, mix together 5 grams of the stater, 15 grams flour, and 15 grams water.
Rad, that’s what I figured – thanks so much!
Hi, I love your blog! Your pictures are all so beautiful :) I was wondering what size bannetone you use – is it a smaller one? Thanks!
hi leona,
thanks so much! yes, it’s a smaller banneton, about 8.5 x 4.5. i got it on amazon (here’s the link) but they don’t sell it anymore!
I have a hard time finding parchment paper that is ovenproof over 425 – have you found some? Or do you just use the regular parchment paper?
hi suzy,
i just use regular parchment paper but trim it to the banneton size so that there’s not much that’s exposed to the oven heat. hope that helps!
This is such a great blog. I don’t own a kitchen scale and am wondering if this recipe can be provided with standard measurements (e.g. cups, tsps., etc). Thank you :-)
hi may,
i haven’t made this using cups and tbsp so i can’t really answer accurately :( it’s really hard to judge how much flour is getting packed into a cup measure – it’s one of the reasons why so many bread recipes out there depend on weight measures.
for the sourdough starter, you can definitely just use tablespoons and teaspoons, but when it comes to the actually loaf, i’m not too sure how to help!
Hi there! No problem. I ended up getting a scale and wow, game changer! Now i can start. Thank you!